Lijit Ad Tag
Aug 31, 2010
A Not So Hokkien Poem
She has this mango tree out in her front yard that must be as old as we are (not telling), or even older, that still fruits like I've never seen a small, short and kinda bare mango tree fruit before. Believe me, I was in their kitchen with some of the harvest and I couldn't find a place to sit.
To cut a long story short, she woke up early in the morning one day, and found a young chap on her tree, stealing the mangoes. When she yelled at him, he said his wife is "bunting" (that's pregnant in malay) and was craving the fruit. So, okay, out of the kindness of her heart plus the abundance of the harvest, she allowed him to take some. Next thing you know, he came back the next day when they were all out, with huge trash bags. This was witnessed by the neighbor.
The funniest part was, when they went to the neighborhood village market the next morning, they found their own mangoes selling for $5 a kilo.
So here's the Not So Hokkien poem : with some attempts at translation...
Cha cha khee, (Early in the morning)
Been chooi khee. (Brushing my teeth)
Thiah teok chiu chang tan, khua khee. (Heard a noise in the tree & looked up)
Khua tiok sair mor ay kaki. (Saw a pair of hairy legs)
Cho mik su pek wah ay mango tree? (Why are u climbing my mango tree?)
Loke lai tiong kim immediately! (Come down immediately)
Mango bo sek cho mik tao take nee? (Mangoes are not ripe, why steal?)
Wa ay chu lai bunting ai seh baby. (Wife at home pregnant going to have a baby)
Pak tao tho ka aunty mang thao curi. (Next time just ask, don't steal)
Ok, aunty, wah sorry. (Ok, aunty, I'm sorry)
Tiong kim wa chao liao tak Suzuki. (I'm leaving now on my Suzuki)
Aug 30, 2010
1 Recipe 3 Cookies
The previous recipe for Soft, Chewy, Choc Chips Cookies can be improvised. It's all up to your imagination! From that 1 recipe, I've managed to make these 3 somewhat different textured and flavored cookies.... Smooth Regular Chocolate Chips , Chunky Choc with Walnuts and Chocolate Chips with Raspberry swirl.
I'm using a raspberry sauce given to me by Rowena, a student of mine who came back from her holidays to Australia. So sweet of her to remember I love mucking about in the kitchen.


Aug 25, 2010
Soft and Chewy Choc Chips Cookies
I use coffee granules in this recipe as I love the flavor combination of coffee and chocolate together. Chopped walnuts are also a good add-on. And these cookies are perfect with a nice cup of java. Mmmm... coffee .... doesn't that make you want to have a cuppa right now?

INGREDIENTS
6 oz unsalted butter, softened, but not melted
1 cup brown sugar
1/4 cup caster sugar
1 egg
2 tsp vanilla extract / 1 tsp vanilla essence
2 cups plain flour
2 tsp cornstarch
1 tsp baking soda
1/2 tsp salt
1 1/2 tsp instant coffee granules
6 - 8 oz dark chocolate, cut into small chunks / dark chocolate chips
METHOD
Preheat oven to 180C / 350F.
Cream together butter and both sugars until smooth and creamy.
Add egg and vanilla and blend in.
Stir in flour, cornstarch, baking soda, coffee and salt.
Fold in chocolate chips.
Drop by 1 tbs of dough onto a lined or greased baking sheet, leaving space in between for cookies to spread.
Bake about 10 - 12 mins (depending on the size of cookies) or until golden and lightly browned around the edges.
Let cool slightly on sheets before transferring to a rack.
Cool completely before storing in an airtight container.
PS: Should your dough become a little too soft in between baking, you can put it in the refrigerator for a few minutes.

Aug 23, 2010
EASY BASIC FOCACCIA
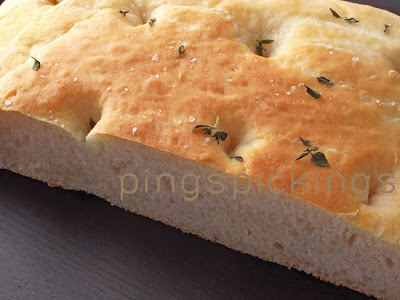
This is a very simple, foolproof focaccia recipe with a light crust and soft texture. You can use a mixer with the dough hook attachment , by hand (this recipe is small enough to be kneaded by hand easily) or like me, I make full use of my trusty bread machine using the "dough" / "manual" cycle of a 1 - 1 1/2 lb loaf capacity tin. And I've tweaked it a little by adding in about 1 tbs of fresh thyme leaves just before the end of the kneading cycle. And also a sprinkling of another tbs on the top before baking.
The variations you can do with this ..... mmmm!

INGREDIENTS
3/4 cup water
2 tbs grape seed oil
2 cups high protein flour / bread flour
1 tbs sugar
1 tsp salt
1 1/2 tsp quick active dry yeast
1/2 tsp bread improver (optional)
grape seed oil for drizzling
coarse sea salt for sprinkling (optional)
METHOD
Carefully measure out all the ingredients (except the oil for drizzling and the salt for sprinkling) in the bread machine pan.
Use the "Dough"/"Manual" cycle.
Meanwhile, oil the base and sides of a 9" X 9" deep non-stick pan, or if it's not non-stick, you can line the bottom of the oiled pan with parchment paper and remember to oil that too.
At the end of the cycle, remove dough from the pan with oiled hands (the dough tends to get a little sticky).
Press dough into the prepared pan and push it well into the corners and sides.
Leave covered with a plastic sheet to rise until doubled in size. About 30 mins.
Heat oven to 200˚C.
Make indentations in dough at 1" intervals with oiled thumb or fingers (I have a very small thumb).
Drizzle with oil and sprinkle with salt.
Bake 18 - 20 mins or until golden brown. Serve warm or toasted.

Aug 22, 2010
PINEAPPLE JAM

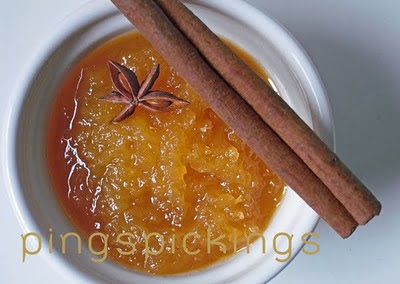
Anyway, this recipe is carried out in the traditional way of grating the fruit by hand with a grater and not with a mandolin nor a food processor. There's no harm in using either but the texture just wouldn't be the same. Don't be deterred by the process, it's actually quite fun.
This jam is quite the favorite during Chinese New Year. So why am I posting it in the middle of August? Well, I have friends and family folks who can't seem to wait til the next CNY. According to them, anytime's a good time for pineapple tarts.
I've used this same jam for pineapple tartlets and they've turned out great. You can make it a little drier if using for pineapple cookies filling. For open tartlets, it will dry out a little during baking. Unfortunately I don't have a pic for those tartlets at the moment but I promise I'll post them soon. Another alternative is to use this jam with thumbprint cookies. Or just spread it on buttered toast. Yum!
INGREDIENTS
2 large ripe pineapples, remove skin & "eyes" - separate core and flesh
sugar - ratio 1:1 of semi drained grated pulp to sugar
1 large cinnamon stick
2 whole star anise
4 cloves (optional)
1 lemon, juiced and grated for rind (keep seeds for pectin)
METHOD
Grate the pineapple flesh with a coarse grater. (If you use a food processor, you'll end up with a finer mush). Grate pineapple cores with the finest grater.
Combine both grated pulp and put into a sieve and allow most of the liquid to drizzle into a large stainless steel pot. Do not squeeze.
When the juice has stopped drizzling, measure out the pulp into cups or weight and then have that same amount of sugar measured out. You may reduce the sugar by half a cup but any less and the jam won't gel. (I'm not using any pectin substitutes here).
Once you have the measurements for the sugar, you can put everything (juice, pulp, sugar, cinnamon, star anise, cloves-if using, lemon juice, grated rind and lemon seeds - can be put into a small muslin bag or just pick them out when bottling) into your big pot.
Bring to boil over a medium heat, then reduce heat and continue to stir at a simmer until most of the liquid has reduced and thickened to a sticky consistency.
Cool before using them in cookies and tarts or bottle while hot into sterilized jars.