Lijit Ad Tag

Showing posts with label DIY. Show all posts

Jul 20, 2016

Air-fried Chinese Roast Pork Belly


I must confess. 

As much as I love roast pork, esp the crackling, I've never attempted this at home ... til now.
Fearing all that splatter in my oven and the smells that might contaminate my cakes, etc etc, I've managed to live on store bought roast pork. In this region, I can get by quite happily since there are so many good ones about. 
Then the air fryer came about, caught my eye, got me wondering, wanting, checking out various recipes that have been successfully done in one. I've been putting off getting an air fryer for the longest time. You know, new toy, play with it for awhile, get tired of it and then makes way for the next new gadget and takes up what little space I have. Wait and wait some more ...shall I, shan't I?
Then I visited a neighbouring country and found a locally made air fryer for less than half the price of the popular branded one. Everything about it screams COPY but hey, works the same and it might be sitting on the shelf in a couple of months due to boredom or whatever. Why the heck not?

So here I am, trying out everything I possibly can with it. And boy, I am so happy with this thing, I'm willing to put it in the same <3 category as the slow cooker. 


I've done the basics of potato fries, eggplant, you know .... zzz

I needed to do this at least once and you can see why I'm so happy with it. The crackling turned out super! I'll definitely be making this again.

Cleaning was easy and the color was nice and even. And I believe it takes a shorter time than in a regular oven. Meat below the crackling was moist and tender. The only complaint is having to pierce the skin....I really need to find a better and easier way to do that. But, Oh, the satisfaction of seeing that bubbling crackle!

I'm using the basic instructions from bakecooklove and tweaked some.


Ingredients


about 700g pork belly (with skin intact, cleaned and wiped dry)


salt

white vinegar

Marinade: 


1 tsp 5 spice powder

half tsp white pepper
pinch of salt
roasted garlic paste (just plonk a whole bulb of garlic in the air fryer, cook for a few minutes @ 180°C until it's soft enough to mash)

Method


I did not blanch or boil the meat as instructed as I figured all that natural sweetness would just go to waste. 


Pierce the skin with a fine, sharp skewer. Don't get lazy with this part. The more holes the merrier. 

Rub the marinade ingredients into the meat part only.
Leave in fridge overnight uncovered to dry out the skin.
(I pierced more holes after drying out the skin ... )
Preheat the air fryer at 180°C.
In the meantime, brush the skin with white vinegar and coat with salt. (Just put salt in a wide bowl or plate and dip the skin onto it. )
Wrap the bottom part with foil, leaving the skin exposed.
Air fry for about 20 mins. Remove from air fryer and scrape off the caked up salt.
Air fry again for about another 20 mins or until skin is nice and golden and crackly.

Enjoy while warm. 

Should there be any leftovers (you're kidding!), just plonk it into the air fryer for about 3 mins and the crackling will be nice and crunchy again. 


For those who are thinking of getting an air fryer but in doubt of which to get, here are some reviews of certain models which you may or may not find in your area. 
https://www.reviews.com/air-fryer/


Jul 22, 2015

Overnight Oats


Some folks just don’t like eating oats. I’ve been told it’s boring.
Well …. YOU are boring. 
Oats are so boring you can actually make it very interesting. 

Growing up, mum used to dump an egg, milk and honey in my oats, cook it to a custardy yumminess and serve it to a delighted me. Don’t go eeww … custard IS made with eggs.

Just last week, a visiting good friend was talking about overnight oats. That triggered a childhood craving for oats …. but with a new and modern, healthy twist … no cooking and raw.

You know, it saves a ton of time in the morning. Just prepare it the night before and it’ll be nice and ready when you’re rushing for time the next morning. 
It’s yummy and keeps you energised til lunch …. sometimes I still don’t feel hungry at lunchtime and just have a light snack. How good is that? And that’s even after a tough 2-hour tennis game. Of coz that also depends on how much of the oats you consume.

This is my portion …
(I use a 200 ml jam jar)

3 - 4 heaped tbs rolled oats
1 tsp chia seeds (this makes it gooey. I love gooey oats …. oats are meant to be gooey. You can omit this if you don’t want it gooey. It’ll be a little coarser. I’m not a horse. I don’t like coarse and gritty down my throat)
1 tsp honey
1 good pinch of cinnamon
milk (filled to about 3 quarters of the jar)

Stir everything together and then add the fruits. You can also add the fruits just before eating.

diced peaches
blueberries

Put the lid on and leave in the refrigerator overnight. 
Yeah … overnight …. why do you think it’s called OVERNIGHT oats?


Tons of options:

Almond / soy milk
Yogurt (dilute a little)
Nuts
Other spices
Chocolate chips / syrup
Cocoa powder
Coffee
Raisins
Bananas
Your fav fruit
Whatevers ……

DO NOT be boring


Oct 30, 2014

HAPPY HALLOWEEN !


The Great Pumpkin is gonna be so sore at me. I seem to have eaten all of my pumpkins and left none to carve and welcome halloween in. 
Shhh…don’t tell him what this is …. it’s a pumpkin in its halloween costume…yeah…that’s it.
They’re getting really good at make-up and their costumes these days, don’t ya think? Great disguise!

Anyway…have a Happy Halloween y’all !!
Enjoy the season with it’s wonderful gorgeous colours which we (in this part of the world) can only visualise unless somebody forgets to water their garden.


Jun 5, 2014

Sprouting Ideas: Chia


You’ve heard of Chia pets. Chia seeds. I wrote a little about it a while ago while experimenting (messing around really) with it in a spiced peach jam.

Full of nutrition, minerals … healthy benefits.
Ground chia seeds are great in bread and cakes. 
Now come the sprouts. Great in salads and sandwiches. Saw this on several sites and I decided to give it a go. I love sprouts … all sorts. They’re expensive to buy. Dunno why … it’s so easy and quick to grow. 

Has anyone tried sprouts on buttered bread? You know those dainty little things called cucumber sandwiches? Replace them cucumbers with sprouts, lashings of butter and lovely soft white bread …. or whatever healthy alternative soft bread you like. I’m going for something that pleases my tummy and fussy tongue buds …nothing healthy here …. oh … fine …. health food … ground chia seeds bread? Close your eyes while you chew on them … minus the crunch, they taste like cucumber…use your imagination.

Anyway …. I had fun growing these cute thingies. 
I’d used the plastic container for coffee machine pods. You can use old egg cartons, unglazed clay tiles, any shallow container. 

On clay surfaces, just sprinkle an even layer of seeds on a soaked tile. Give the seeds a spray of water and continue spraying it daily keeping them moist. They’ll turn into a gelatinous goop but it’s fine. They’ll sprout soon enough. 

Here’s what I did for mine …

STUFF

coffee pods container / egg carton
cotton buds
Chia seeds
water


METHOD

Wet the cotton buds and and fill each hole of the container. 
Sprinkle an even layer (do not over crowd the seeds) on the soaked cotton. 
Leave on a sunny window sill or any sunny area but not in direct sunlight. 
Sprinkle water on the cotton buds daily or whenever it looks/feels dry. 
It’s important to keep it moist.
Wait patiently for those cute thingies to sprout. 
Trim when sprouts are about 2-3 cm tall…about 2 weeks or so.

Throw out cotton and start all over.


Feb 21, 2012

DIY: Salted Eggs


I'm a simple girl at heart ... GIRL?! *Ahem* ... Let me rephrase that ....

I'm a simple person at heart.
I like simple things.
I'm comfortable in jeans and a t-shirt.
I wear very minimal make up and that's if I have to.
I like the simple things in life (but I need the air conditioner. If you live in this part of the world, you would too)
And, I like simple food ... most times.

Mum used to make me eat rice congee/porridge when I was sick .... I hardly get sick, but I'd still developed a dislike for congee. I call it "Sick Food". But mum knows me too well and she'd include two halves of a hard-boiled salted duck egg, some braised soy beans/peanuts in soy sauce and some pickled mustard greens. And I'd be happily swallowing 2 bowls of congee ... ok, maybe I wasn't thaaaat sick.

So, when I saw this Homemade Salted Eggs post at Sonia's, I knew I had to make these, or at least try to, at least once ... just to know how.
Not that it's expensive to buy from the shops or there's any difficulty getting them, it's just a condiment that's also getting pretty popular these days. The restaurants have come up with the latest craze .... salted egg yolk everything. There's salted egg yolk pumpkin, crab, fish, shrimp, chicken, vegetables .... all of which I love!
Oh, wait .... this is turning into something not so simple after all , whoops.
Secret's out ... I need to make those dishes for myself at home! That's my weakness ... food. Makes you wonder why I have to keep getting new jeans every so often.

Well, I tried the recipe and it turned out really well, except that I thought it was a lot saltier than what I'm used to. Maybe I'll try to reduce it by a few days.
I'm very happy with it and this won't be a one time experiment. In fact, I've already started on the 2nd batch and I'm also trying it out with chicken eggs.

[Here's the update: I have been asked about making this with chicken eggs and fortunately I had a batch ready yesterday. Honestly, don't even bother with chicken eggs. It's nothing as good as duck eggs. Salted chicken eggs tastes just like regular hard-boiled eggs dipped in a little salt. Duck eggs (esp the yolks) have a very rich milky flavor. My suggestion for those who can't get or have difficulty getting duck eggs is to use goose eggs ... assuming that's an easier find. *shrug*.
Unless maybe, you're adventurous enough to try it with ostrich eggs ... tell me about it if you do.]

For Sonia's step by step guide and more beautiful pictures, click here.
I've reduced the recipe by half for this round since it was suppose to be a test batch. Besides, I didn't have a container large enough to fit too many eggs.


INGREDIENTS


8 duck eggs
200g coarse salt
500 ml water


METHOD


Wash eggs well and dry with a soft cloth or paper towels. (Do not soak eggs).
Place salt and water in a pot and boil until salt is completely dissolved.
(*Note: I've found that not all the salt could dissolve but that's ok. Read on ...)
Leave to cool. (You'll notice the salt starting to crystallize around the pot. That's when you know the salt to water ratio is correct). Strain.
Place eggs in a large, clean glass jar, add the salt water solution.
(Make sure the eggs are completely submerged. To help the eggs stay submerged, I'd filled a small plastic bag with air, sealed it and placed it on top before replacing the jar lid).
Store in room temperature for 14 days.
Boil eggs for 10 mins before serving.


FYI: The traditional way to get rid of the shell after it's boiled is NOT to peel the egg as you would with a normal hard boiled egg but to cut the egg in half, lengthwise, then scoop out as you would an avocado.


Feb 9, 2012

Chocolate Dipped Candied Ginger


This'll spice up your love life. No, not talking about weird toys or little blue pills. Just something sweet, something spicy, something different.
I had made some candied ginger at the post before this. And it occurred to me to turn this plain little cube-like things into something a little more exotic than the usual chopped-up-and-put-into-cakes-or-cookies.
Valentine's Day is just around the corner. And may I remind everyone that this day isn't just for the head-in-the-clouds folks, but also for old fogies like me to appreciate and to send out some appreciation and some platonic love (in case some folks get the wrong idea here).
Ok, shutting up now .... going to get some spice in my life ... going to chew on some chocolate ginger. What were you thinking?


INGREDIENTS


candied ginger (see previous post)
good quality dark chocolate (sweet, semi sweet, bitter, white, whatever)


METHOD


Melt chocolate however you want. I zapped mine in the microwave in short bursts (so that it doesn't burn).
Stir in between zaps.
Dunk candied ginger pieces halfway into chocolate. (You can dunk the whole thing if you like).
Allow to cool and set in fridge.


*Tip: Skewer the ginger pieces, dunk them in chocolate and then stick the skewers into a styrofoam block while they cool and set (like a pin cushion) so that they don't get smeared.

February is #chocolatelove month! Check out all the gorgeous yummies!


Feb 3, 2012

DIY: Candied Ginger

(Thank you everyone for helping get this to FoodBuzz Top 9)


Funny how our tastes change over the years. Or maybe I should just speak for myself.
I used to hate ginger as a kid ... even as a young adult. It took me awhile to get to like this interesting little rhizome. And it all started with this ... candied ginger.
These unassuming little things are great to add into fruitcakes and cookies ... even eaten on it's own, unless you're not into ginger, of course.
Ginger is actually very good in aiding digestion, treats stomach discomforts, reduces nausea, motion sickness, morning sickness, arthritic pains and a whole lot of other things that I've read about, told about and haven't had a chance to do anything about ... that's good in a way I suppose.
The Chinese revere this humble root. It's a definite must for confinement dishes, supposedly getting rid of bloatedness and toxic gases in the tummy. "Confinement" here means the recovery period after birth for the new mother, not criminals in jails.

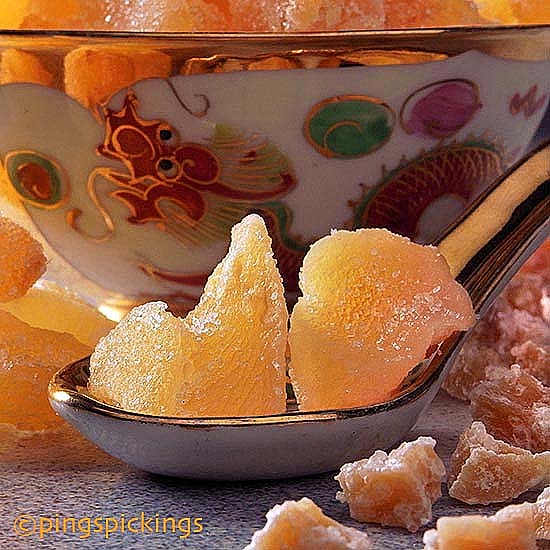
I took this opportunity to show off a small part of the family heirloom. The spoon and bowl, both with a hand-painted dragon motif, is part of a set that has some real gold bits on them. I'm not too sure if it's safe to use them for eating because of the lead content normally found in the glaze of old Chinese ceramics. Since it's the dragon year, we dug them out of their cupboard "caves" for the festivities before they are banished for another 12 years.

To get nice clear, translucent pieces of candied ginger, you'll have to get super young ginger roots. It really doesn't matter if they're a little older but bear in mind that you'll have a more pungent and spicier flavor.

I have here a batch made from younger rhizomes and another from slightly older ones. You can see the difference in the colors. I'd made smaller pieces out of the older roots since they're "spicier" and takes a little longer to soften.

It isn't difficult. It doesn't take too much time. And the best part at the end of it is, you can use the leftover syrup to make homemade ginger ale or a slight twist to that, lemongrass ginger ale.


INGREDIENTS

young ginger
sugar
water

(What? You're expecting more ingredients?)


METHOD

Peel and slice ginger into 1/2" thick rounds or cubes. Halve the size for older ginger (you can tell it's TOO old when there's too much fiber).
Place cut ginger into a pot and add enough water to cover the pieces.
Cook on medium heat for about 30 - 45 mins or until pieces are tender, depending on how old the ginger is.
Drain, reserve about 3 - 4 tbs of liquid.
Weigh drained ginger. Add the same amount of sugar and the reserved liquid in pot and bring to a boil. Lower heat and simmer until ginger turns translucent and liquid is reduced. About 45 mins - 1 hour.
Leave to cool a little. Drain and reserve sugar syrup to make ginger ale.
Toss drained pieces in powdered sugar or not (it's up to you). Separate the pieces out so that they don't clump together.
Allow to dry overnight on a piece of parchment.
Store in jars or airtight containers.

Note: Since this doesn't contain any preservatives, I'd suggest keeping them in the refrigerator for a longer shelf life.


Aug 29, 2011

Vanilla Custard


This was made to go with the Spotted *ahem* in the last post.
Ok, ok, I'm no prude ... Spotted Dick, it was. You should have read what Veronica of Quay Po Cooks commented and a suggested name ... hilarious!

I think ... no, scrap that .... I'm definitely happier with the custard than the pudding. But there will be another post on the pudding soon. I won't give up til I get it right.

This is a no-fail recipe (can't say the same for the blinking pudding) and so simple to make and a very versatile topping to any dessert. Any leftovers and you can even turn it into a french-styled vanilla custard ice cream.
This makes a good 1 cup-and-a-bit of runny / pouring custard.
Feel free to double the recipe.

Check out those lovely specks of vanilla seeds!

INGREDIENTS

250 ml whole milk
150 ml cream
3 egg yolks
40 g sugar
1 vanilla pod

METHOD

In a saucepan, combine milk, cream and whole vanilla pod.
Bring to almost boiling and reduce heat to simmer for 10 mins.
Remove from heat.
In a separate bowl, whip egg yolks and sugar until pale in color.
Remove vanilla pod from milk and set aside.
Add hot milk to egg yolk mixture, a little at a time, whisking continuously as you go along.
Once all the milk has been incorporated, pour mixture back into the saucepan.
Split the vanilla bean into half lengthways, scrape the seeds and add it to the egg mixture.
On medium heat, keep stirring until custard is thick enough to coat the back of a spoon.
Remove from heat.
Serve with your favorite dessert.

*Note: Custard will thicken a little more while cooling.
For a slightly thicker custard, heat a little longer but be careful as it may curdle.


Jan 15, 2011

My Latest Squeeze: Soy Milk


Nope ... no hot gossip. Just literally "my latest squeeze", as in, hand-squeezed soy bean milk. I know it's such a dinosaur-age method and I do have a soy milk maker that grinds, boils and filters (all-in-one) but somehow (I can't quite put my finger on it) it doesn't taste right. Or maybe my machine isn't as good as it claimed to be...

So for a long while now, it's been sitting in storage,... oh wait, have I given it away? Whatever, it doesn't matter anyway. I've resorted to making it this way, not really prehistoric, since I'm using the blender (hehe) but squeezing out the goodness with a cloth strainer bag. Good finger exercise.


I like my soy milk rich but feel free to dilute with more water if you like.


Included in this recipe is a simple syrup flavored with pandan ... a tip handed down through the generations, to mask the beany taste of the beverage.


Makes about 2 liters.


INGREDIENTS (SOY MILK)


300 g soy beans, soaked overnight

1 1/2 cups water to every 2 cups of soaked beans


METHOD


Give the soaked beans a light rubbing to remove as much of the loose skin as possible.

Blend every 2 cups of beans with 1 1/2 cups of water. Pour small amounts at a time into cloth strainer bag, give it a twist to close off the top (so that there'll be no accidental spurts of juice and paste) and squeeze out the milk into a large pot.

Put aside residue. Continue until all beans are used up (each time saving the residue for a second squeeze).

Add another 1 1/2 cups of water to every 2 cups of the residue, blend and squeeze again.

Discard pulp.


Bring the milk to a rolling boil and remove from heat.

Add simple syrup to taste. Can be served hot or cold.


INGREDIENTS (SIMPLE PANDAN SYRUP)


1 cup sugar

1 cup water

1 pandan / pandanus leaf


METHOD


Put both sugar and water into a small pot. Knot the pandan leaf and place it into the pot together with the sugar and water. Heat pot over medium heat for about 10 mins or until sugar has dissolved completely. Discard pandan leaf.


Jan 14, 2011

DIY: Powdered Sugar


I've recently been in Macaron Mania Mode and I've noticed that every recipe calls for pure icing sugar / powdered sugar / confectioners sugar. No big deal, until you discover that the only icing sugar your neighborhood store carries, contains cornstarch or wheat flour in the mix which supposedly improves its flowing ability, therefore very suitable for making icing or frosting ... but not macs. And when you can actually find some confectioners sugar in the fancy bakery supplies store, which is actually pure powdered sugar, it's so not worth paying the price for. Yup, I'm cheap. So, I come up with alternatives.
Just whizz some caster sugar in a dry mill or a food processor until you get the consistency of talc. Sift it if you must.
Easy peasy and no holes in my apron pockets.


Dec 4, 2010

DIY: Candied Citrus


I was looking to get some nice looking citrus peel to decorate some citrus bars I was planning to make. And all I could find were those dried chopped up peel that looks like it had been on the shelves for a decade and a day. No cute pinwheel ones that you see on the desserts in the fancy cafes or those long elegant stalks that decorate that yummy, luscious chocolate cake calling out to you from the cake shop window .... grrr.
So, I've decided that if I want something done a certain way, I'll just have to do it myself. (This applies to a lot of everyday doings too!). It's not worth the effort, running all over the city, fighting the traffic, and when you finally find some, it'll probably cost an arm and another limb and a couple of traffic citations to boot. Double grrr.
Perhaps these don't look too elegant right now, but I'm gonna be making more and hopefully, in due time, I'd get the hang of it and eventually they'll be shop-window worthy. Fingers and other digits crossed...


INGREDIENTS

Lemons
Oranges (washed and scrubbed, organic would be better)

* I made pinwheel lemons and orange strips

SYRUP

1 cup sugar
1/2 cup water
(if you need a larger amount just use the ratio of 2:1 sugar to water)

METHOD

Cut fruits into slices or slivers. If using peel alone, discard as much of the bitter white pith as possible.
Put cut peel into a pot and add just enough water to cover the whole lot.
Put over medium heat for 15 mins. Discard liquid and repeat the process with fresh water 3 -4 times. (I did it only 3 times as I prefer a little bitterness to the peel). Discard liquid and allow peel to dry out a little on a rack.
Meanwhile, prepare the syrup.
Place the sugar and water in a pan and allow sugar to dissolve completely on low heat.
When completely dissolved, place peel into syrup and leave to simmer until most of the syrup is absorbed and peel looks translucent.
Remove from pan and coat evenly in powdered sugar. Leave on racks to dry.
Store in an airtight container and keep in a cool, dry place.